


Entry posted by kavag ·
609 views
A client of mine has asked me if it would be possible to run pfSense as a Microsoft Azure IaaS Virtual Machine. pfSense® software is a free, open source customized distribution of FreeBSD, specifically tailored for use as a firewall and router that is entirely managed via web interface.
At that time, I had in mind that running FreeBSD 10 under Hyper-V and in Microsoft Azure, is something that can be done. So, I decided to build a deployment as a Proof of Concept and to write a blog post about this deployment.
This post will provide instructions and all the necessary steps to prepare, upload and run pfSense-2.2.3 in Microsoft Azure.
Please note, that FreeBSD is not currently an endorsed distribution in Microsoft Azure and therefore is not supported.
Resources
- Latest Stable Version of pfSense
- Running FreeBSD in Azure
- User Defined Routes and other Azure Virtual Network enhancements that announced at Microsoft Ignite 2015
Design
Let’s put, what we want to achieve, into context. The deployment’s design is as follows:

Procedure
In order to prepare a pfSense image for Microsoft Azure, we should download the latest x64 image and install it locally, on a server with Windows Server 2012 R2, as a Hyper-V Virtual Machine:
- Download the latest x64 pfSense image from Latest Stable Version of pfSense (As of July 2015 the latest version is 2.2.3)
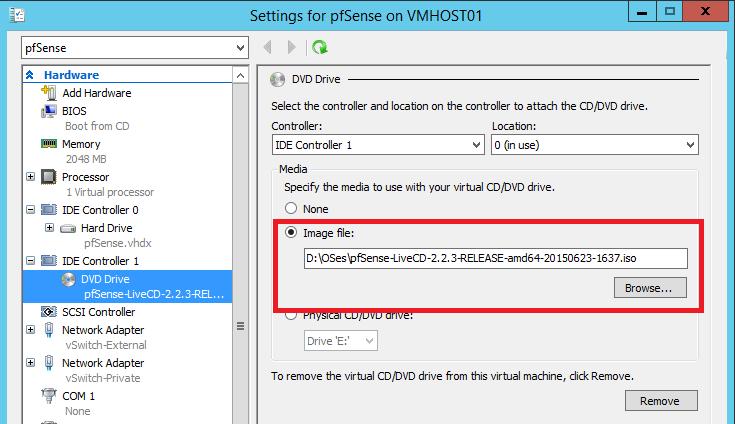
- Decompress the image file to extract the Installation ISO pfSense-LiveCD-2.2.3-RELEASE-amd64-20150623-1637.iso
- Attach the ISO file as a DVD Drive to newly created Hyper-V Virtual Machine
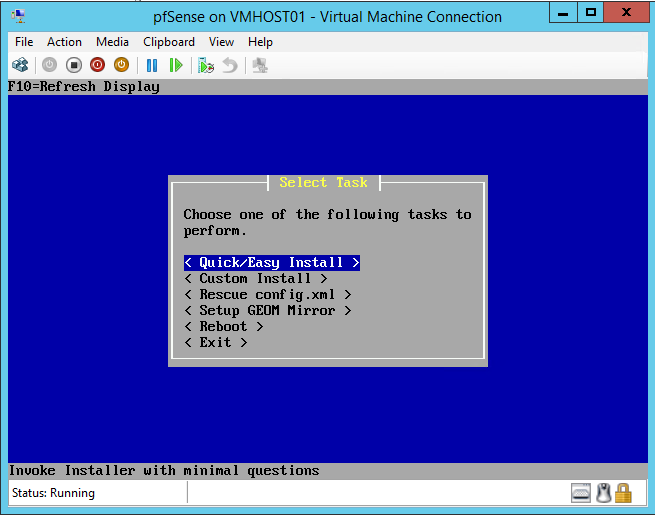
- Start the installation of pfSense
- After successful installation of pfSense, enable SSH

- Install Python 2.7 and required modules
[2.2.3-RELEASE][[email protected]]/: pkg install python27 py27-asn1
Updating FreeBSD repository catalogue...
FreeBSD repository is up-to-date.
All repositories are up-to-date.
Checking integrity... done (0 conflicting)
The following 3 package(s) will be affected (of 0 checked):

New packages to be INSTALLED:
        python27: 2.7.10
        py27-asn1: 0.1.7,1
        py27-setuptools27: 17.0

The process will require 67 MiB more space.

Proceed with this action? [y/N]: y
[1/3] Installing python27-2.7.10...
[1/3] Extracting python27-2.7.10: 100%
[2/3] Installing py27-setuptools27-17.0...
[2/3] Extracting py27-setuptools27-17.0: 100%
[3/3] Installing py27-asn1-0.1.7,1...
[3/3] Extracting py27-asn1-0.1.7,1: 100%
Message for python27-2.7.10:
=====================================================================

Note that some standard Python modules are provided as separate ports
as they require additional dependencies. They are available as:

bsddb           databases/py-bsddb
gdbm            databases/py-gdbm
sqlite3         databases/py-sqlite3
tkinter         x11-toolkits/py-tkinter

=====================================================================
[2.2.3-RELEASE][[email protected]]/:
You should symlink the new python 2.7 binary
[2.2.3-RELEASE][[email protected]]/: ln -s /usr/local/bin/python2.7 /usr/bin/python
- Install sudo
Typically on Azure, root account is disabled and we using uprovileged user to login. An unprivileged user should utilize sudo to run commands with elevated privileges.
[2.2.3-RELEASE][[email protected]]/: pkg install sudo
Updating FreeBSD repository catalogue...
FreeBSD repository is up-to-date.
All repositories are up-to-date.
The following 1 package(s) will be affected (of 0 checked):

New packages to be INSTALLED:
        sudo: 1.8.14

The process will require 3 MiB more space.
796 KiB to be downloaded.

Proceed with this action? [y/N]: y
Fetching sudo-1.8.14.txz: 100%  796 KiB 815.0kB/s    00:01
Checking integrity... done (0 conflicting)
[1/1] Installing sudo-1.8.14...
[1/1] Extracting sudo-1.8.14: 100%
[2.2.3-RELEASE][[email protected]]/:
- Install the Azure Linux Agent
GitHub is the repository where you can find the latest version of Azure Linux Agent
https://github.com/Azure/WALinuxAgent
Version 2.0.10 or later is required for FreeBSD. Branch 2.0 is typically very stable and as of July 2015 the latest version is 2.0.14.
[2.2.3-RELEASE][[email protected]]/: wget https://raw.githubusercontent.com/Azure/WALinuxAgent/2.0/waagent
--2015-07-23 13:25:16--  https://raw.githubusercontent.com/Azure/WALinuxAgent/2.0/waagent
Resolving raw.githubusercontent.com (raw.githubusercontent.com)... 185.31.17.133
Connecting to raw.githubusercontent.com (raw.githubusercontent.com)|185.31.17.133|:443... connected.
HTTP request sent, awaiting response... 200 OK
Length: 245087 (239K) [text/plain]
Saving to: 'waagent'

waagent                         100%[======================================================>] 239.34K   624KB/s   in 0.4s

2015-07-23 13:25:17 (624 KB/s) - 'waagent' saved [245087/245087]

[2.2.3-RELEASE][[email protected]]/: mv ./waagent /usr/sbin/
[2.2.3-RELEASE][[email protected]]/: chmod 755 /usr/sbin/waagent
[2.2.3-RELEASE][[email protected]]/: /usr/sbin/wa
[2.2.3-RELEASE][[email protected]]/: /usr/sbin/waagent -install
[2.2.3-RELEASE][[email protected]]/:
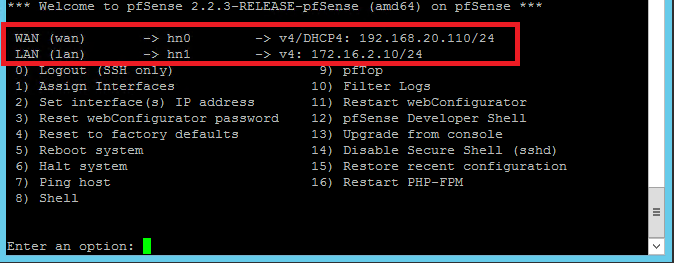
- Set IP Addresses
Configure WAN (hn0) Interface as DHCP client.
Assign Static IP Address, 172.16.2.10, to LAN (hn1) Interface
- Shutdown The pfSense Virtual Machine
Now the pfSense Virtual Machine is ready for running in Microsoft Azure.
Upload the pfSense-2.3.3 VHD to Azure
Using the following PowerShell commands, first we upload the pfSense VHD to Microsoft Azure Storage Account and then we create a custom image:
# Variables Section
$DestFile = "https://pfsa.blob.core.windows.net/vhds/pfSense-2.2.3-amd64.vhd"
$SourceFile = "C:\Hyper-V\pfSense\Virtual Hard Disks\pfSense-2-2-3.vhd"

# VHD Upload
Add-AzureVhd -Destination $DestFile -LocalFilePath $SourceFile
# Create an Image
Add-AzureVMImage -ImageName "pfSense-2.2.3" -MediaLocation $DestFile -OS Linux
Note that we are using OS type Linux instead of FreeBSD as it is not currently supported.
Create a Multi-NIC Virtual Machine
The custom image that we created previously, can be used in order to create a pfSense Virtual Machine with two Virtual Network Interfaces (vNIC), in Microsoft Azure. More details about creating a Virtual Machine with Multiple vNICs in Microsoft Azure, you can find in a previous post here:
Create a Virtual Machine with Multiple NICs in Azure IaaS
A pfSense Virtual Machine with two vNICs will be created by running the following PowerShell commands:
$location = "West Europe"
$serviceName = "pfsvc"
$vnet = "pf-VNET"
$subscriptionName = 'My MSDN Subscription'
$storageAccount = 'pfsa'
$adminUser = "adminuser"
$pwd = "*********"
$imageName = "pfSense-2.2.3"

$MultiVM = New-AzureVMConfig -ImageName $ImageName `
	   -Name "pfSense-FW01" -InstanceSize ExtraLarge |
       Add-AzureProvisioningConfig -Linux -LinuxUser $adminUser `
	   -Password $pwd |
       Set-AzureSubnet -SubnetNames "Front-End" |
       Set-AzureStaticVNetIP -IPAddress "172.16.1.10" |
       Add-AzureNetworkInterfaceConfig -Name "LAN NIC" `
	   -SubnetName "LAN-Subnet" -StaticVNetIPAddress 172.16.2.10


New-AzureVM -ServiceName $serviceName `
            -Location $location `
            -VNetName $vnet `
            -VMs $MultiVM
Setup User Defined Routes
With user defined routes, we have complete control over the traffic flow in our virtual network. Virtual network by default provides system routes for traffic flow between virtual machines. Now, we can customize the routing table by defining routes and that is allowing us to direct traffic through pfSense Virtual Machine that we have just created. Routes can be defined inside a routing table and applied to subnets. Every VM within a subnet automatically inherits the routes from the routing table.
The following PowerShell commands, allowing us to:
- Create the routing tables
- Create routes in the routing tables
- Apply routing tables to subnets
- Enable IP Forwarding on pfSense’s vNICs
#
# Variables Section
#
$Location="West Europe"
$VNetName="pf-VNET"
$FrontendName="FE-Subnet"
$LANName="LAN-Subnet"
$ServiceName = "pfsvc"
$VM = Get-AzureVM -Name "pfSense-FW01" -ServiceName $serviceName

# Set the route table of the Frontend network:
#
$FrontRT = New-AzureRouteTable -Name $FrontendName `
		-Location $Location -Label "FE-RT"
Set-AzureRoute -RouteTable $FrontRT -RouteName "DMZ-Route" `
		-AddressPrefix "172.16.2.0/24" -NextHopType "VirtualAppliance" `
		-NextHopIpAddress "172.16.1.10"
Set-AzureSubnetRouteTable -VirtualNetworkName $VNetName `
		-SubnetName $FrontendName -RouteTableName $FrontendName

# Set the route table of the LAN network:
#
$LANRT = New-AzureRouteTable -Name $LANName `
		-Location $Location -Label "LAN-RT"
Set-AzureRoute -RouteTable $LANRT -RouteName "FE-Route" `
		-AddressPrefix 172.16.1.0/24 -NextHopType VirtualAppliance `
		-NextHopIpAddress 172.16.2.10
Set-AzureRoute -RouteTable $LANRT -RouteName default -AddressPrefix 0.0.0.0/0 `
		-NextHopType VirtualAppliance -NextHopIpAddress 172.16.2.10
Set-AzureSubnetRouteTable -VirtualNetworkName $VNetName -SubnetName $LANName `
		-RouteTableName $LANName


# Enable IP Forwarding on the main NIC and secondary NICs:
#
Set-AzureIPForwarding -ServiceName $ServiceName -VM $VM -Enable
Set-AzureIPForwarding -ServiceName $ServiceName -VM $VM `
		-NetworkInterfaceName "LAN NIC" -Enable
The pfSense Virtual Machines must be able to receive incoming traffic that is not addressed to itself and this is the reason to enable IP forwarding.
The post Running pfSense as an Azure IaaS Virtual Machine appeared first on Vaggelis Kappas.
0 Comments
Recommended Comments
There are no comments to display.