


nkspeed
-
Posts
700 -
Joined
-
Last visited
-
Days Won
14
Content Type
Profiles
Articles
Forums
Blogs
Posts posted by nkspeed
-
-
επειδη διαβαζοτνας το δεν το καταλαβαινω, ειναι ευκολο να κανεις ενα διαγραμμα?
ΝΚ
-
Μία ερώτηση. Αν γραφτείς στο Office 365 Trial για 1 μήνα και διαλέξεις την συνδρομή Premium για επιχειρήσεις, Δημιουργήσεις όλα αυτά που πρέπει κλπ και στην συνέχεια όταν αποφασίσεις να προχωρήσεις στην αγορά, μπορείς να επιλέξεις στο πακέτο που έχεις εγκαταστήσει να βάλεις κάποιο μικρότερο πακέτο πχ Essentials για επιχειρήσεις?
Επίσης αν δημιουργήσεις ένα Κοινόχρηστο Γραμματοκιβώτιο (Distribution Group) πχ info και βάλεις κάποιους χρήστες members αυτό το info θεωρείται σαν χρήστης και πρέπει να το πληρώνεις? Λογικά από όσο ξέρω δεν θεωρείται χρήστης αλλά ρωτάω εσάς που τα ξέρετε καλύτερα.
Ευχαριστώ
Σχετικα με το πρωτο ερωτημα δεν ειμαι σιγουρος αλλα νομιζω ναι. στο δευερο ερωτημα πληρωνεις ΜΟΝΟ για mailbox χρηστων, οχι για groups, alias, emails, public folders.
NK
-
Θα σου προτεινα κατι ανορθοδοξο αλλα εχει δουλεψει τελεια για εμενα. Στεινεις ενα ESXi και πανω του φτιαχνεις τα HyperV vms. φτιαχνεις οτι δικτυα θελεις, ακομα και storage για να κανεις ολα τα lab σου
ΝΚ
-
Δεν ειμαι σιγουρος αν το office 365 τελικα ειναι το χειροτερο προιον της Microsoft η εχει βγαλει χειροτερο απο αυτο. Πέρσι πηραμε μια αποφαση να φυγουμε απο τον SBS και να παμε στο office365. Προαγορασαμε 32 αδειες για ενα χρονο, στην αρχη ολα καλα ολα ωραια, τα προβληματα αρχισαν οταν θελαμε να παρουμε μερικες ακομα. Η λογικη (η δικη μου εστω) θα ελεγε οτι εχεις 3 μηνες για να ληξει το ετος αρα θα πληρωσεις την αντιστοιχεια ή κατι παραπανω.
ΟΧΙ ΦΥΣΙΚΑ. Η microsoft πιστευει οτι πρεπει να πληρωνεις το ποσο που αντιστοιχει στο καθε acount για ενα χρονο, και αντι να ληξουν οι παλιες σε 3 μηνες και οι νεες σε 12 θα ληξουν ολες μαζι σε 3μηνες + τον αγνωστο Χ οπου ειναι το κοστος που πληρωσες και αντιστοιχει στο συνολο. Βγαινει με ενα μαθηματικο τυπο που ΔΕΝ ΓΝΩΡΙΖΕΙ ΚΑΝΕΝΑΣ το ξανα γραφω ΔΕΝ ΓΝΩΡΙΖΕΙ ΚΑΝΕΝΑΣ ΣΤΗ MICROSOFT.
Αποφασιζω οτι ΔΕΝ ΠΛΗΡΩΝΩ κατι που δεν μπορω να ελενγξω και θα περιμενω να ληξουν οι αδειες. ΜΙΑ εβδομαδα πριν ληξουν πηγαινω μεσα απο το portal και ακολουθωντας τις οδηγιες που εχω παρει απο τον partner αλλα και απο το support της microsoft, κανω RENEW subscritpion αλλα με αλλο τροπο πληρωμης, δηλαδη με το μηνα για να μην ξαναντιπετωπισουμε το παραπανω προβλημα. Το αποτελέσμα ειναι να εχω για μια εβδομαδα (δεκα μερεα) 64 αδειες, γιατι στην ουσια πατωντας renew μου εφτιαξε νεο subscription με αλλες 32 αδειες. Το προβλημα και παλι δεν ειναι το κοστος αλλα η αντιμετωπιση που λαμβανω απο το support "λυπαμαι αλλα δεν μπορει να γινει κατι πρεπει να ληξουν μια εβδομαδα νωριτερα" και απο τον partner "εχει ακομα μικροπροβληματακια το portal".
Ειμαι αρκετα προβληματισμενος για το αν αξιζει να συνεχισω με το ιδιο προιον!
ΝΚ
-
Το νούμερο είναι παραπλανητικό και το ίδιο το site *δεν* το χρησιμοποιεί για τον υπολογισμό το uptime. Είναι το άθροισμα του downtime σε *όλα* τα regions. Ο μέσος όρος ανά region είναι 3.5 ώρες και uptime 99.959%. Μακάρι τέτοια failure rates να είχαν όλοι.
Θα συμφωνησω μαζι σου οτι ειναι για ολα τα region, και οσα περισσοτερα εχεις τοσο σπαει ο μεσος ορος, θα διαφωνησω για το παραπλανητικο γιατι ετσι ακριβως μετραει και τους αλλους παροχους.
ΝΚ
-
Δεν υπαρχει το τελειο εργαλειο, αλλα το εργαλειο που γνωριζεις καλυτερα ειναι το καλυτερο. Εδω και πολλα χρονια το ubuntu ειναι η ευκολοτερη και γρηγοροτερη λυση για linux. Οπως και να εχει ομως το gui ειναι το δυνατο χαρτι των windows, και το command line του linux. Αυτος ο συνδιασμος με εχει βολεψει. Χρησημοποιω το linux μονο core server και για gui παντα windows.
ΝΚ
-
Επειδη πρεπει να λεμε τα πραγματα οπως ειναι, στο αρθρο του theregister αναφερει οτι το azure εχει μια κακη χρονια για το2014 σε σχεση παντα με τους μεγαλους παιχτες της αγορας στο κομματι της διαθεσιμοτητας. Αναλυτικοτερα το Azure ειχε 103 outages με συνολικο χρονο 43 ωρες, αντιστοιχα για google 86 μ 3,5 ωρες και τον μεγαλο αντιπαλο Amazon EC2 με το εντυπωσιακο των 12 outages και 2 ωρες.
Αναλυτικα η διαθεσιμότητα ολων των cloud services.
https://cloudharmony.com/status-1year-of-storage-and-compute-group-by-regions-and-provider
NK
-
Δυστυχώς είναι θέμα της πλατφόρμας και του IE 11. Εάν προσπαθήσεις με τον Firefox το paste λειτουργεί κανονικά
και με τον chrome μπορει :PPPP
NK
-
O Symon εχει κανει πολλες ομιλίες για τη microsot, ειναι καλος, ευκολος να τον παρακολουθησεις χωρις να κουραζει.
ΝΚ
-
Μπραβο παναγιωτη πολυ καλο και μπραβο που το μοιραζεσαι.
ΝΚ
-
-
Φοβερό post σχετικά με τη διαχείριση του cluster με powershell.
http://powershelldistrict.com/failover-clustering-powershell/
How to get all the nodes of a cluster using PowerShell?
Import-Module FailoverCluster -Force
$Cluster = get-cluster -name $env:computername
How to get All the VM’s present on a node from HyperV failover cluster with powershell?
$Nodes = Get-ClusterNode -Cluster $Cluster.Name

write-log "Cluster $($Cluster.Name) contains $($Nodes.count) nodes."

foreach ($node in $nodes){
    Write-Log "Cluster Node $($Cluster.Name) contains the following VMs"
    $Vms = get-vm -ComputerName $Node.Name
       Foreach ($Vm in $Vms){
          write-Log "$Vm.Name"
       }

}
How to get the VM state on a failover cluster using powershell
write-log "Starting state changes operations on node: $($node.Name)"
        Foreach ($vm in $VMs){

            if ($vm.Name -like $DataServerName){
                write-log "The DATA server $($vm.Name) is skipped until all machines have been saved or are stopped."
            }else{
                switch ($vm.state){
                    "Running"{
                                write-log "Saving VM $($VM.name) state."

                                try{
                                    Save-VM -ComputerName $Node.Name -Name $vm.name -ErrorAction Stop
                                    write-log "--> Successfully saved"
                                }catch{
                                    write-log $_
                                }
                    }
                    "Stopped"{
                                write-log "The VM $($VM.name) is already in stoped state. No action done."
                    "Saved"{
                                write-log "The VM $($VM.name) is already in saved state."
                    }
                    default{
                        Write-log "The current state $($vm.state) could not be defined. Skipping VM."
                        continue
                    }

                }#End switch
            }#End If *data*
        }#End foreach VM
Failover clustering: How to stop a cluster resource (the Quorum) using PowerShell?
##Quorum operations
 write-log "Starting Quorum operations"

 $Quorum = Get-ClusterQuorum -ErrorAction stop

 write-log "Attempting to set Quorum $($Quorum.QuorumResource) offline."

 Stop-ClusterResource -Name $Quorum.QuorumResource.name
Failover clustering: How to set Clustered share volumes in maintenance mode using Powershel
##Cluster shared volume operations
           write-log "Starting operations: Setting cluster share volumes into maintenance mode."

           $CSVs = Get-ClusterSharedVolume -Cluster $Cluster

           write-log "There are $($CSVs.count) clustershared volumes identified on $($Cluster)."

           foreach ($csv in $CSVs){

               try{

                   if (!($csv.name -eq $Quorum.QuorumResource.name)){

                       Suspend-ClusterResource -Name $csv.name -force -ErrorAction stop | Out-Null

                       write-log "Successfully set clusterSharedVolume $($csv.name) into maintenance mode."
                   }

               }catch{
                   write-log $_
               }
           }
Failover clustering: How to stop a cluster resource using powershell?
##Cluster operations
            $ClusterNodeToshutdown = Get-ClusterNode | where {$_.name -ne $env:COMPUTERNAME}
            write-log "Attempting to stop the cluster $($Cluster.Name)."

            Stop-Cluster -Cluster $Cluster.Name -Force -ErrorAction stop

            write-log "The cluster resource $($Cluster.Name) has been successfully stopped."
Failover clustering: How to stop a cluster node using powershell?
$ClusterNodeToshutdown = Get-ClusterNode | where {$_.name -ne $env:COMPUTERNAME}

##Shutting down other cluster Node


    write-log "Attempting to shutdown the cluster node $($ClusterNodeToshutdown.Name)."
    Stop-Computer -ComputerName $ClusterNodeToshutdown.name -Force
ΝΚ
-
Καλά το θέμα άδειες έτσι και αλλιώς δεν πολύ μετράει. Εκτός αν έχεις τον server για να σηκώσεις άλλα vm εκτός από windows server.
Δεν καταλαβαινω πως ακριβως το γραφεις. Η καθε αδεια standard σου δινει δυο επιλογες. Μια μονο εγκατασταση σε φυσικο μηχανημα ή σε virtualization platform αλλου κατασκευαστη, ή εκγατάσταση ΜΟΝΟ HyperV ρολου στο φυσικο μηχανημα και δυο windows VM. Αν εσυ χρησημοποιησεις και καποιον ακομα ρολο στο Host (πχ Active Direcotry) τοτε θυσιάζεις μια αδεια απο τα VM.
ΝΚ
-
Η NASUNI για μια ακόμη χρονιά εκδίδει το ετήσιο State of Cloud Storage Report, Αυτή τη φορά το παρουσιάζει με ένα όμορφο infographic στο οποίο συγκρίνει την ταχύτητα, την διαθεσιμότητα και την πιθανότητα λαθών. Αναλυτικά το πλήρες report θα το βρείτε εδώ.
Performance – How fast data can be read/written to the cloud?
Availability – Is the data in the cloud always available? Is the cloud ready to accept data?
Errors – As the number of objects stored in the cloud increases, are there resulting errors?
-
Προσωπικά αν δεν εχεις sccm προτιμώ το plan 3 με τα ίδια τα hypervisor να είναι DC.
Θεωρώ ποιο ασφαλή τροπο προσωπικά. Ο φόρτος τους ειναι μηδενικός σαν dc.
Εχεις δυο προβληματα, το πρωτο ειναι οτι θα πρεπει να ειναι windows server και οχι ο hyperv server (ωστε να μην εχεις θεμα αδειοδότησης) και το δευτερο ειναι οτι η microsoft δεν το δινει ως best practice.
Σκεψου κατι απλο, οτι 1ον δεν μπορεις να το κανεις roll back στο system state, και οτι αν χασεις το Active Direcotry χανεις ολον τον host.
NK
-
Μου δινει το DynDns -15% για 3 νεους λογαριασμους. δεν γραφει για ποσο χρονο θα ισχυει. οποιος θελει το χρησιμοποιει.
Referal Code: RFE1N33V57 Give your friends 15% off (new accounts only)
ΝΚ
-
Σε μικρές υποδομές πάντα υπάρχει το δίλημμα του active directory. αν θα γίνουν join οι hosts.
Το άρθρο στην ουσία περιγράφει 4 σενάρια.
- Να παραμείνει ένας DC σε φυσικό μηχάνημα.
- Να μην γίνουν join στο domain τα hosts, αλλά χάνονται όλα τα πλεονεκτήματα.
- Να δημιουργηθεί ένα δεύτερο Active Directory μόνο για τους Hosts.
- Να βρίσκεται ο DC σε vm στους hosts που τον φιλοξενούν.
Και μερικά καλά tips για το τελευταίο σενάριο:
- οι DC θα πρέπει να είναι always start σε περίπτωση που επανεκκινήσει ο Host.
- θα πρέπει να μπει delay στα υπόλοιπα VMs ώστε να ανέβει ο DC όσο γρήγορα γίνεται.
- Ακόμα ένα βασικό είναι το VM να μην είναι σε Save State ώστε να γίνει shutdown ο DC όταν ο host επανεκκινήσει.
- Θα πρέπει να υπάρχει η δυνατότητα πρόσβασης στους Hosts και με το local account.
NK
-
Ένας χρήσιμος οδηγός και ευκολοδιάβαστος για μια γρήγορη εισαγωγή στο linux.

NK
-
και τα windows updates!!
NK
-
Ενα αρκετα χρησιμο util για οσους χρησιμοποιούν vmware ειναι το rvtool. Εχει τη δυνατότητα να εξαγει πανευκολα πληροφοριες απο vCenter η Esx(i) hosts σε excel μεσω γραφικου περιβαλλοντος η μεσω γραμων εντολών ωστε να ενσωματώνεται και σε script. Για παραδειγμα εξαγει πληροφοριες για τις παρακατω κατηγορίες (με πολλες υποκατηγοριες για το καθε ενα)
- VMs
- CPU
- Memory
- Disks
- Partitions
- Network
- Floppy drives
- CD drives
- Snapshots
- VMware tools
- Resource pools
- Clusters
- ESX hosts
- HBAs
- NICs
- Switches
- Ports
- Distributed Switches
- Distributed Ports
- Service Consoles
- VM Kernels
- Datastores
- Multipath inf
- Health Checks
ΝΚ
-
επειδη δεν υπαρχει linux section και το αρθρο ειναι πολυ καλο το ανεβαζω εδω.
εξηγει γιατι οι δανομες σταματουν τη χρηση των net-tools (ifconfig, route, arp and netstat) και τα αντικαθιστουν με την iproute. εχει μαλιστα και παραδειγματα εντολων απο τα παλια εργαλεια στα νεα.
περισσοτερα εδω
Linux TCP/IP networking: net-tools vs. iproute2Many sysadmins still manage and troubleshoot various network configurations by using a combination of ifconfig, route, arp and netstat command-line tools, collectively known as net-tools. Originally rooted in the BSD TCP/IP toolkit, the net-tools was developed to configure network functionality of older Linux kernels. Its development in the Linux community so far has ceased since 2001. Some Linux distros such as Arch Linux and CentOS/RHEL 7 have already deprecated net-tools, and others are planning to do so in favor of iproute2.
iproute2, which is another family of network configuration tools, emerged to replace the functionality of net-tools. While net-tools accesses and changes kernel network configurations via procfs (/proc) and ioctl system call, iproute2 communicates with the kernel via netlink socket interface. The /proc interface is known to be more heavyweight than netlink interface. Putting performance aside, the user interface of iproute2 is more intuitive than that of net-tools. For example, network resources (e.g., link, IP address, route, tunnel, etc.) are aptly defined with "object" abstraction, and you can manage different objects using consistant syntax. Most importantly, iproute2 has been under active development so far.
If you are still using net-tools, it is time to switch to iproute2, especially if you want to catch up with the latest and greatest networking features of the Linux kernel. Chances are that there are many things you can do with iproute2, but cannot with net-tools, be it source-based routing, QoS, VLAN, bonding, bridges, etc. It's also worth noting that higher-level network configuration tools such as network manager depend on iproute2.
For those who want to make the switch, here is a round-up of net-tools vs. iproute2 comparison.
Show All Connected Network InterfacesThe following commands show a list of all available network interfaces (whether or not they are active).
With net-tools:
$ ifconfig -aWith iproute2:
$ ip link show
Activate or Deactivate a Network Interface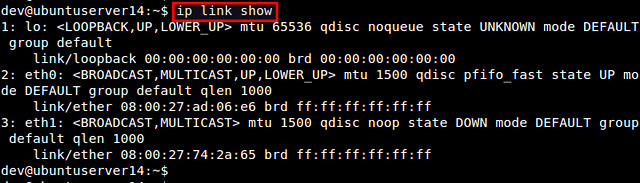
To activate/deactivate a particular network interface, use these commands.
With net-tools:
$ sudo ifconfig eth1 up
$ sudo ifconfig eth1 downWith iproute2:
$ sudo ip link set down eth1Assign IPv4 address(es) to a Network Interface
$ sudo ip link set up eth1Use these commands to configure IPv4 addresses of a network interface.
With net-tools:
$ sudo ifconfig eth1 10.0.0.1/24With iproute2:
$ sudo ip addr add 10.0.0.1/24 dev eth1Note that with iproute2, you can assign multiple IP addresses to an interface, which you cannot do with ifconfig. A workaround for this with ifconfig is to use IP aliases.
$ sudo ip addr add 10.0.0.1/24 broadcast 10.0.0.255 dev eth1Remove an IPv4 address from a Network Interface
$ sudo ip addr add 10.0.0.2/24 broadcast 10.0.0.255 dev eth1
$ sudo ip addr add 10.0.0.3/24 broadcast 10.0.0.255 dev eth1As far as IP address removal is concerned, there is no proper way to remove an IPv4 address from a network interface with net-tools, other than assigning 0 to the interface. iproute2 can properly handle this.
With net-tools:
$ sudo ifconfig eth1 0With iproute2:
$ sudo ip addr del 10.0.0.1/24 dev eth1Show IPv4 Address(es) of a Network InterfaceChecking IPv4 addresses of a particular network interface can be done as follows.
With net-tools:
$ ifconfig eth1With iproute2:
$ ip addr show dev eth1Again, if there are multiple IP addresses assigned to an interface, iproute2 shows all of them, while net-tools shows only one IP address.
Assign an IPv6 address to a Network Interface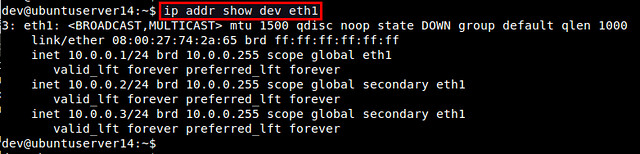
Use these commands to add IPv6 address(es) to a network interface. Both net-tools and iproute2 allow you to add multiple IPv6 addresses to an interface.
With net-tools:
$ sudo ifconfig eth1 inet6 add 2002:0db5:0:f102::1/64
$ sudo ifconfig eth1 inet6 add 2003:0db5:0:f102::1/64With iproute2:
$ sudo ip -6 addr add 2002:0db5:0:f102::1/64 dev eth1Show IPv6 address(es) of a Network Interface
$ sudo ip -6 addr add 2003:0db5:0:f102::1/64 dev eth1Displaying IPv6 addresses of a particular network interface can be done as follows. Both net-tools and iproute2 can show all assigned IPv6 addresses.
With net-tools:
$ ifconfig eth1With iproute2:
$ ip -6 addr show dev eth1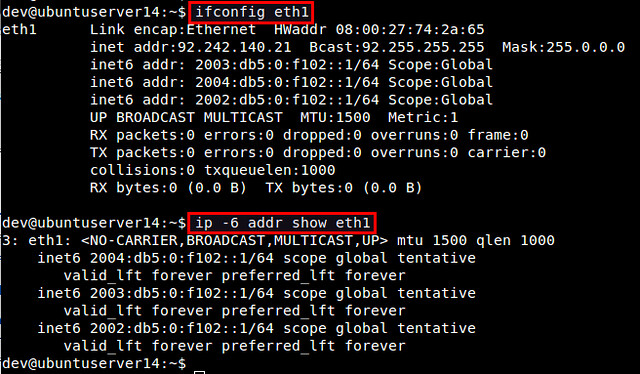 Remove an IPv6 address from a Network Interface
Use these commands to remove any unnecessary IPv6 address from an interface.
With net-tools:
$ sudo ifconfig eth1 inet6 del 2002:0db5:0:f102::1/64With iproute2:
$ sudo ip -6 addr del 2002:0db5:0:f102::1/64 dev eth1Change the MAC Address of a Network InterfaceTo spoof the MAC address of a network interface, use the commands below. Note that before changing the MAC address, you need to deactivate the interface first.
With net-tools:
$ sudo ifconfig eth1 hw ether 08:00:27:75:2a:66With iproute2:
$ sudo ip link set dev eth1 address 08:00:27:75:2a:67View the IP Routing Tablenet-tools has two options for showing the kernel's IP routing table: route or netstat. With iproute2, use ip route command.
With net-tools:
$ route -n$ netstat -rnWith iproute2:
$ ip route show
Add or Modify a Default Route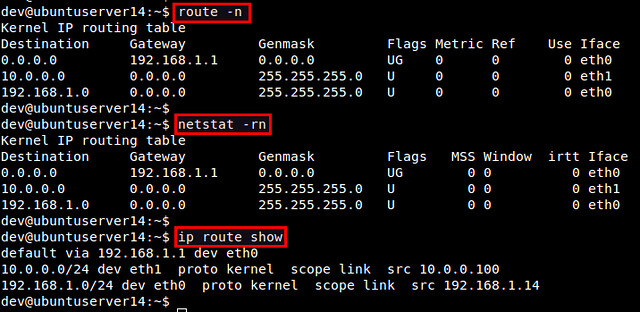
Here are the commands to add or modify a default route in the kernel's IP routing table. Note that with net-tools, modifying a default route can be achieved by adding a new default route, and then removing an old default route. With iproute2, use ip route replace command.
With net-tools:
$ sudo route add default gw 192.168.1.2 eth0
$ sudo route del default gw 192.168.1.1 eth0With iproute2:
$ sudo ip route add default via 192.168.1.2 dev eth0Add or Remove a Static Route
$ sudo ip route replace default via 192.168.1.2 dev eth0A static routing can be added or removed with the following commands.
With net-tools:
$ sudo route add -net 172.16.32.0/24 gw 192.168.1.1 dev eth0
$ sudo route del -net 172.16.32.0/24With iproute2:
$ sudo ip route add 172.16.32.0/24 via 192.168.1.1 dev eth0View Socket Statistics
$ sudo ip route del 172.16.32.0/24Here are the commands to check socket statistics (e.g., active/listening TCP/UDP sockets).
With net-tools:
$ netstat
$ netstat -lWith iproute2:
$ ss
$ ss -l
View the ARP Table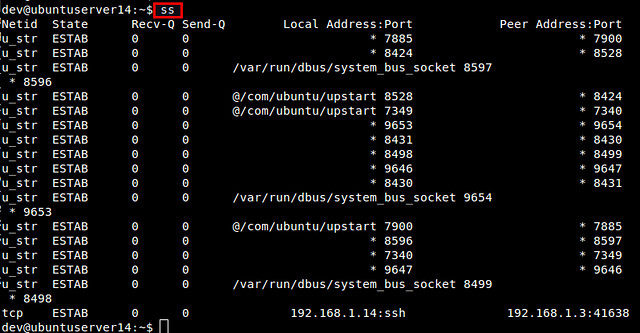
You can display the kernel's ARP table with these commands.
With net-tools:
$ arp -anWith iproute2:
$ ip neigh
Add or Remove a Static ARP Entry
Adding or removing a static ARP entry in the local ARP table is done as follows.
With net-tools:
$ sudo arp -s 192.168.1.100 00:0c:29:c0:5a:ef
$ sudo arp -d 192.168.1.100With iproute2:
$ sudo ip neigh add 192.168.1.100 lladdr 00:0c:29:c0:5a:ef dev eth0Add, Remove or View Multicast Addresses
$ sudo ip neigh del 192.168.1.100 dev eth0To configure or view multicast addresses on a network interface, use the commands below.
With net-tools:
$ sudo ipmaddr add 33:44:00:00:00:01 dev eth0
$ sudo ipmaddr del 33:44:00:00:00:01 dev eth0
$ ipmaddr show dev eth0
$ netstat -gWith iproute2:
$ sudo ip maddr add 33:44:00:00:00:01 dev eth0
$ sudo ip maddr del 33:44:00:00:00:01 dev eth0
$ ip maddr list dev eth0
-
Αντιγραφή απο εδώ σχεδόν όλα τα applets που μπορουν να τρεξουν απο command line. Οτι εχει extention cpl εκτελειται απεθειας απο command line, τα αλλα τρέχουν με control /name Microsoft.WindowsUpdate.
Control smscfgrc – Command Line Shortcut to launch Configuration Manager SCCM Control Panel Applet
control SMSRAP – Command Line Shortcut to Launch Configuration Manager SCCM Run Advertised Programs (RAP) Canonical names of SCCM RAP
control SMSPDM – Command Line Shortcut to launch Configuration Manager SCCM Program Download Manager (PDM)
AppWiz.cpl – Command Line Shortcut for launching Add Remove Programs – Control Panel\All Control Panel Items\Programs and Features
BthProps.cpl – Command Line Shortcut for launching Bluetooth Devices – Control Panel\All Control Panel Items\Devices and Printers\Bluetooth Devices
CollAb.cpl – Command Line Shortcut to change your profile picture via People Near Me (Only for Windows 7 and below)
DESK.cpl – Command Line Shortcut to change Control Panel\All Control Panel Items\Display\Screen Resolution
FireWall.cpl – Command Line Shortcut to change Windows FireWall settings – Control Panel\All Control Panel Items\Windows Firewall
FlashPlayerCPLApp.cpl – Command Line Shortcut to Flash Player Settings Manager – It’s not working from Command prompt for me
HdwWiz.cpl – Command Line Shortcut for launching Device Manager
Igfxcpl.CPL – Command Line Shortcut to launch Intel Graphics and Media Control Panel
Inetcpl.CPL – Command Line Shortcut to launch internet properties
Intl.CPL – Command Line Shortcut to launch Regional Setting – Region and Language Setting – Location, Keyboards etc..
Irprops.CPL – Command Line Shortcut to launch Infrared Port Properties
Joy.cpl – Shortcut to launch Game Controllers – Joystick Properties
Main.cpl – Command Line Shortcut to launch Mouse properties
MLCFG32.CPL – Command Line Shortcut to Launch Mail Setup – Outlook – It won’t work from command prompt as this CPL file is located at program files folder
mmsys.CPL – Command Line Shortcut to launch Sound properties
ncpa.CPL – Command Line Control Panel\All Control Panel Items\Network Connections – Shortcut to Network connections
powercfg.CPL – Command Line Control Panel\All Control Panel Items\Power Options – Shortcut to launch Power Plan Configuration
RTSnMg64.CPL – Command Line Shortcut to launch Realtek Audio Manager
‘RTSnMg64.CPL‘ is not recognized as an internal or external command, operable program or batch file.
S32LUCP2.CPL – Command Line Shortcut to Launch Symantec Live Update Configuration – it won’t get launched from from Default command prompt
ERROR message ‘S32LUCP2.cpl’ is not recognized as an internal or external command, operable program or batch file.
sapi.CPL – Command Line Shortcut to launch Speech Properties – it won’t get launched from from Default command prompt
ERROR message ‘sapi.cpl’ is not recognized as an internal or external command, operable program or batch file.
sysdm.CPL – Shortcut to launch System Properties and change the computer name
TabletPC.cpl – Shortcut to launch Tablet PC -Pen, Touch, Handwriting and Flicks configurations
Telephon.CPL -Shortcut to launch Location Information and telephone configuration in OLD times simple-smile.png?w=735
TimeDate.cpl – Shortcut to launch Time and Date, Additional Clocks, Internet Time Configurations
Wscui.cpl – Control Panel\All Control Panel Items\Action Center – Shortcut to launch Action Center
control /name Microsoft.BitLockerDriveEncryption – Shortcut to the configuration of BIT Locker Encryption
Control Panel\All Control Panel Items\BitLocker Drive Encryption
control admintools – Shortcut to launch Control Panel\All Control Panel Items\Administrative Tools
control /name Microsoft.AutoPlay – Shortcut to launch Auto Play – Choose what happens when you insert each type of media or device – Control Panel\All Control Panel Items\AutoPlay
control /name Microsoft.ColorManagement – Shortcut to launch color Management
control /name Microsoft.CredentialManager – Shortcut to launch Credential Manager – This view and delete your logon information. – Control Panel\All Control Panel Items\Credential Manager
control /name Microsoft.DefaultPrograms – Shortcut to Launch Default program – Choose the default programs which is used by Windows – Control Panel\All Control Panel Items\Default Programs
control printers – Shortcut to launch printers – Control Panel\All Control Panel Items\Devices and Printers
control schedtasks – Shortcut to launch Task Scheduler
control /name Microsoft.WindowsUpdate – Shortcut Launch Windows Update – Control Panel\All Control Panel Items\Windows Update
control userpasswords – Shortcut to launch User Account management – Control Panel\All Control Panel Items\User Accounts
ΝΚ -
Για να μην φτιαχνω νεο thread, συνεχιζω εδω.
Κατα τη δημιουργια νεου ποστ που βγαζει
"You have posted more than the allowed number of quoted blocks of text"
Εχει ιδεα κανενας τι ακριβως ειναι αυτο???
ΝΚ
-
Επεσα τυχαια επανω σε κατι που σιγουρα θα ενδιαφερει πολλους. Επιτελους σωστη λυση της Microsoft για την διαχειριση των local admin passwords τερματικων που ειναι σε domain. Παρεχει την δυνατοτητα να αποθηκευει τον καθε κωδικο του εκαστοτε λειτουργικου συστηματος στο active directory, με αποτελεσμα να εχουμε διαφορετικα password ανα υπολογιστη και να εφαρμοζουμε ρολους για admin deligation.
Install LAPS to automatically manage local administrator account passwords on domain-joined computers so that passwords are unique on each managed computer, randomly generated, and centrally stored in Active Directory infrastructure.
LAPS stores the password for each computer’s local administrator account in Active Directory, in a confidential attribute in the computer’s corresponding Active Directory object. The computer is allowed to update its own password data in Active Directory, and domain administrators can grant read access to authorized users or groups, such as workstation helpdesk administrators.
The solution is built on Active Directory infrastructure and does not require other supporting technologies. LAPS uses a Group Policy client-side extension (CSE) that you install on managed computers to perform all management tasks. The solution’s management tools provide easy configuration and administration.
NK


Πρόβλημα με Cisco 2600 router και δικτύωση
in Windows Server
Posted
Εχεις αποκλεισει το καλωδιο?
ΝΚ